In today’s post, we will learn how to deploy a Node site using VueJS to an Alibaba Cloud Elastic Compute Service (ECS) Instance by using PouchContainer, Alibaba’s open source solution for containerization. At the end of this tutorial you will see how easy is to run a container with Pouch on one of the most popular Linux distributions, Ubuntu.
What Is PouchContainer
PouchContainer is a container engine created by Alibaba in 2011 (back then it was known as T4). Back then, T4 was based on LXC to function, but when Docker came popular some years later, Alibaba introduced Docker’s image technology into T4’s architecture to make it much stronger. This meant that, from that moment, Pouch was compatible with Docker images and OCI compliant. Pouch, well-tested at Alibaba’s enormous data centres and put through lots of stress with their colossal transaction volume, is now publicly available since Alibaba made it open source on October 2017. That means that your team can be quickly benefited by just adopting it. And, please, feel free to contribute on the official GitHub page!
Containerization vs. Virtualization
Containerization and virtualization have comparable resource isolation and allocation advantages, but work differently because virtual machines virtualise the hardware instead of just the operating system. Due to the hardware virtualisation, a Virtual Machine includes a full copy of the Operating System and all of its dependencies for every app. This means more space and resources used than a Container, as the last can share the same OS kernel and dependencies with other containers, meaning more applications per computing instance.
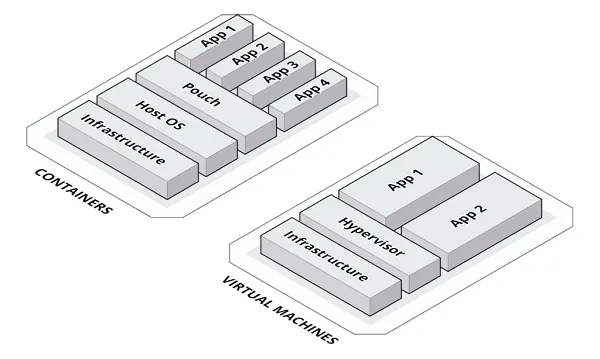
As we can see in the above schema, each app occupies a lot less when deployed using containers. Ideally, the overhead of each container would just be the actual disk space taken by the codebase; like we said, Pouch will share the underlying OS and dependencies.
Setting Up Our ECS Instance
With the concepts of containerization and virtualization being clear, we can create the ECS Instance. Log into the online Alibaba Cloud panel and go to your ECS Console. There, click on “Create Instance”.
If you prefer automating your infrastructure, you might want to check out my article on how to deploy apps effortlessly with Packer and Terraform for a more DevOps approach.
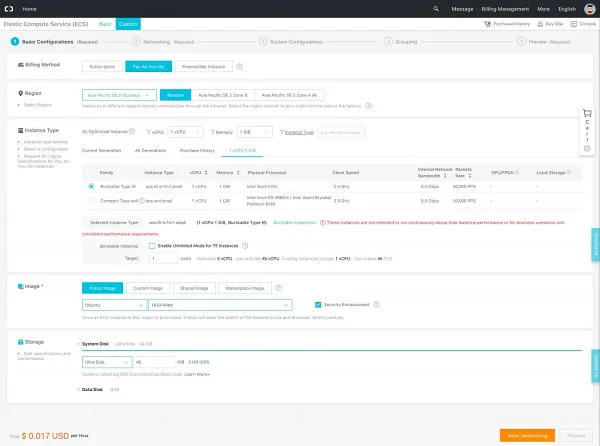
Basic Configurations
For this example we can go with a small instance, as the result will be a static site. Let’s go with an ecs.t5-lc1m1.small. Under Image, select Ubuntu and “18.04 64bit”.
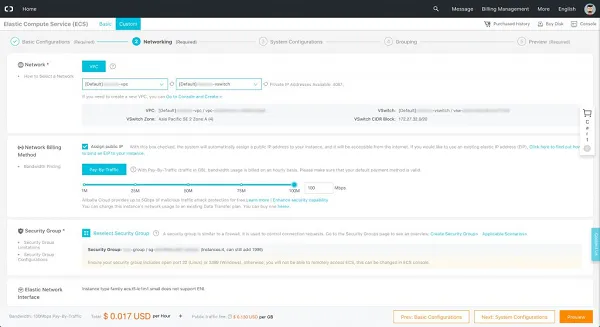
Networking
Time to setup networking, here you would need to select your default VPC and be sure to check “Assign public IP”, this way the ECS Instance will be publicly accessible. The IP setup itself won’t do all the job, so you need to associate a Security Group where the port 80 and port 22 are open.
For more advanced networking setups, you might want to read about setting up load balancers using Terraform to distribute traffic to your application.
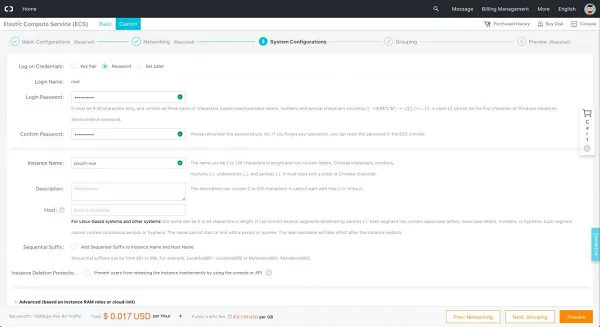
System Configurations
If you don’t have your computer ssh key uploaded to Alibaba Cloud, I recommend you to do it and choose it as login method. If not, just go set a password and don’t forget it!
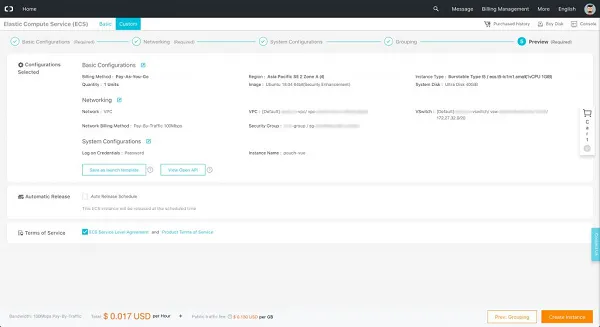
Preview
As a summary, this screen tells you what you are creating to make sure you are fine with that. If everything looks OK, just click “Create Instance” and you are good to go!
Installing Pouch
PouchContainer has an excellent documentation covering all aspects of its usage. Here we will only detail the basic installation for end users.
First, ssh into your instance using ssh [email protected]. Then, run apt-get update and keep reading.
System Dependencies
Let’s start by installing the basic dependencies like LXCFS (for strong container isolation), GIT, and packages to add repositories over HTTPS:
apt-get install lxcfs curl git apt-transport-https ca-certificates software-properties-common
APT Repository
First we will add PouchContainer’s official GPG key by running:
curl –fsSL http://mirrors.aliyun.com/opsx/pouch/linux/debian/[email protected] | apt-key add –
Now, time to setup the PouchContainer repository by typing:
add-apt-repository "deb http://mirrors.aliyun.com/opsx/pouch/linux/debian/ pouch stable"
You’ll probably get a message like
N: Skipping acquire of configured file 'stable/binary-i386/Packages' as repository 'https://mirrors.aliyun.com/opsx/pouch/linux/debian pouch InRelease' doesn't support architecture 'i386'
This is normal and is appearing because you are running a 64bit instance.
Install PouchContainer
Install the latest version of Pouch updating the apt package index first:
apt-get update && apt-get install pouch
After installing PouchContainer, we are ready to go.
Start PouchContainer
Run the following command:
service pouch start
This will start the service. From here, you will be able to start using it by pulling an image and running it with PouchContainer.
If you’re interested in exploring other container solutions on Alibaba Cloud, check out my guide to working with Tengine and OpenResty for web server solutions.
Cloning the Project
Time to get our hands dirty. For this tutorial I prepared a GitHub repository for you to play with and make things easier to learn. Clone it by running
git clone https://github.com/rouralberto/vue-aboutme-page.git
Then navigate into it using
cd vue-aboutme-page
Yes, you are right, there is a Dockerfile in the repo. You can run Pouch containers using Docker images. That is the greatness of using open source software and following standards. Everything just works. To pull images, use pouch pull. To run containers, pouch run. To list running containers, pouch ps. I’m sure you already feel comfortable with it.
Customizing Container Environment
The idea of this tutorial is to create a nice-looking “About Me” page by using VueJS. The Pouch container will run Tengine as Web Server and the content will be static. Let’s do it!
For more advanced web applications using containerized PHP solutions, check out my article on Tengine, Docker, and PHP Application Best Practices.
Once in the project folder, create a deployment bash script file called run.sh with the following contents:
#!/usr/bin/env sh

pouch stop aboutme-vue
pouch rm aboutme-vue
pouch run -d -p 80:80 --name aboutme-vue \
-e VUE_APP_NAME="Your Name" \
-e VUE_APP_LINE="Some words about you here" \
-e VUE_APP_TWITTER_URL="#" \
-e VUE_APP_FACEBOOK_URL="#" \
-e VUE_APP_INSTAGRAM_URL="#" \
-e VUE_APP_LINKEDIN_URL="#" \
-e VUE_APP_FLICKR_URL="#" \
-e VUE_APP_GITHUB_URL="#" \
roura/aboutme-vue

pouch exec -i aboutme-vue npm install
pouch exec -i aboutme-vue npm run build
As you can see, you need to replace the environment variables where there is a # with your social network profile URL. If you don’t have one, just delete the line, so it won’t show up in the final page.
Running the Container
If you are happy with the just-created file, then run the container using the command:
sh run.sh
Wait until everything gets executed.
Enjoy Your Brand New Site
You did it! Open your favorite browser and, if you didn’t assign a domain name to your instance, type your IP and see the results. You should be able to see something like the following screenshot:

If you want to make your application accessible from anywhere with a domain name, you might want to learn about dynamic DNS using Alibaba Cloud DNS API or SSH tunnelling with Alibaba Cloud for local development environments.
Conclusion
I hope this tutorial was useful! If you have followed all instructions carefully, you should have a better knowledge on Alibaba products, as we used Tengine as web server, Pouch as container engine and one ECS Instance to hold it all.
For more advanced deployment strategies, consider exploring build your first serverless website with Alibaba Cloud, which offers an alternative approach to traditional hosting.
Good luck with your cloud journey!